Wednesday, June 19, 2013

A super cute tutorial by Karen.

Tutorial-slider-full

When I first started ScrappyCanuck Studios, I found out how much I loved creating tutorials - which makes sense because I am actually a teacher by trade. But I have to admit that the tutorials have been few and far between lately. However, when I joined the ChiChi Memories design team, they asked if I would be willing to take on one tutorial a month. This was a perfect opportunity to dust off the the old tut hat and get back at it!

So I am really excited to have one for you today!

Tutorial-slider-open


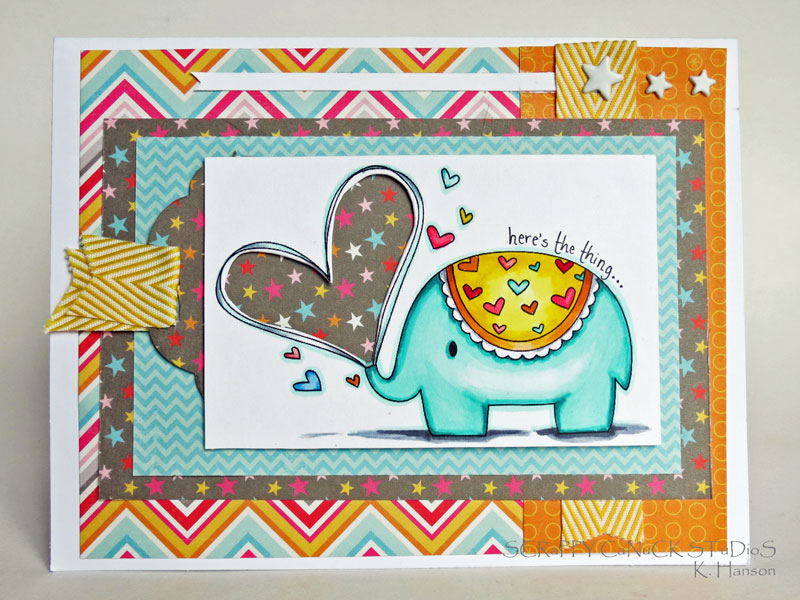
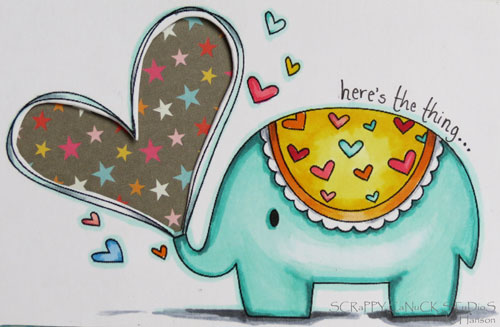
For this little card, I used one of my favourite ChiChi memories stamps called "Elephant Love". In the digi, the heart is actually empty, and I thought that since it was such a great space, it might be fun to create a sentiment slider to enhance this adorable part of the image. So, when closed, the heart is filled with a fun paper pattern, and when open, the sentiment is revealed. It looks far more complicated than it really is - really! Let me show you how:


Materials for slider component:
Tutorial-slider-closeup1


Instructions:
Step 1
CCMT11

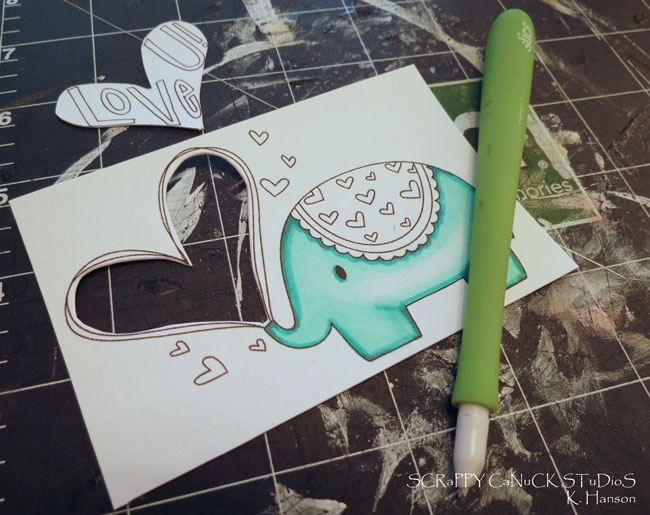
Using a craft knife, carefully cut around the inside of your printed digi. If you are planning on doodling in the cut out, you can do this now or after the slider is assembled.

Step 2

CCMT12

Using a piece of patterened paper, cut out a piece that is at least 1" longer than your stamped image. When placed in the middle, the patterned paper should extend out at least 1/2" from both the right and left sides.

Step 3

CCMT13

Cut a piece of coordinated pattern paper (star paper in this photo) that is as 1/2" longer than your stamped image, and just wide enough to cover the cutout in the stamped image.

Step 4
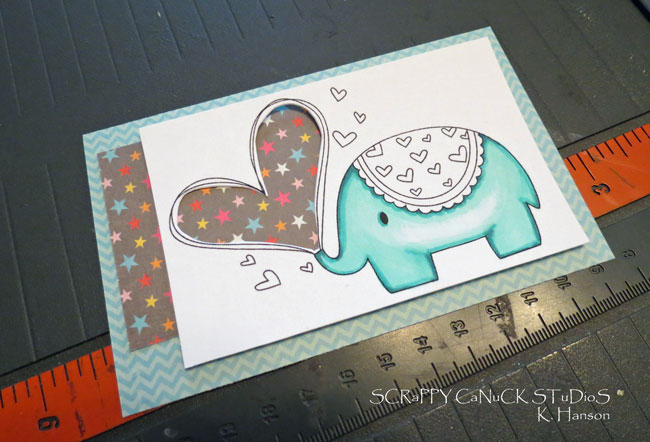
CCMT14

Test fit your papers by placing piece 2 under your stamped image, but on top of piece 1. You want to make sure that part of piece two sticks out on one side as this will become your pull tab.

Step 5
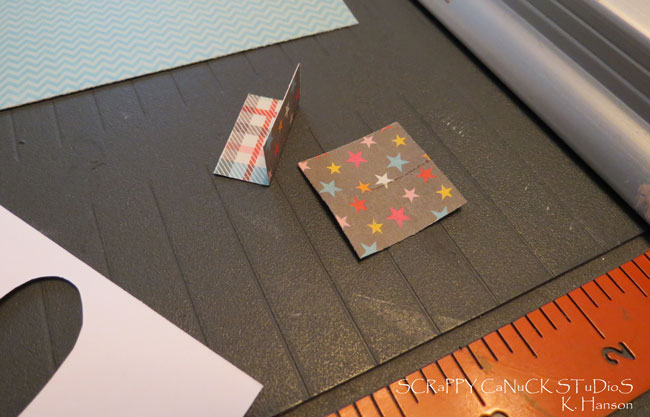
CCMT15

Using any piece of scrap paper, cut 2 1" squares and fold in half (these are the runners for your slider and will not be seen, so do not worry about the appearance of the paper.

Step 6
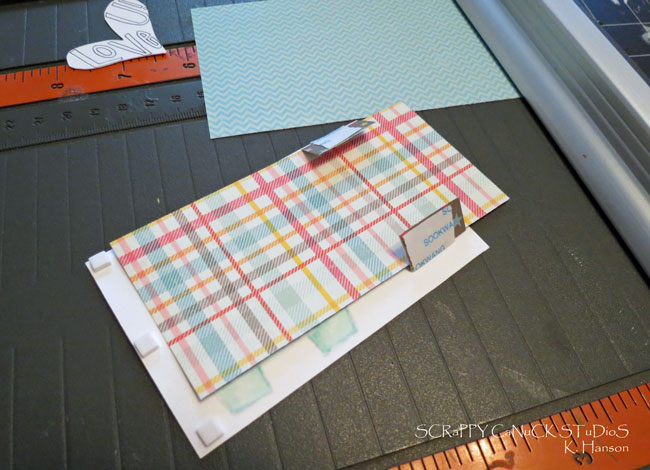
CCMT16

Turn over your stamped image, and place piece two on top in the appropriate place, covering the stamp cut out. Place some adhesive on each of your 1" square tabs and slide them underneath piece 2, pressing down on the adhesive to hold the slider in place. Add three small foam adhesive square to the far end to compensate for the thickness created by the slider and the tracks for the slider. This will also act as a stopper on the far end.

Step 7

CCMT17

Take the backing off of all of your adhesive, turn over the stamped image and slider and adhere to piece 1 of your patterned paper. pull out on piece 2 to make sure it easily slides in and out.

Step 8
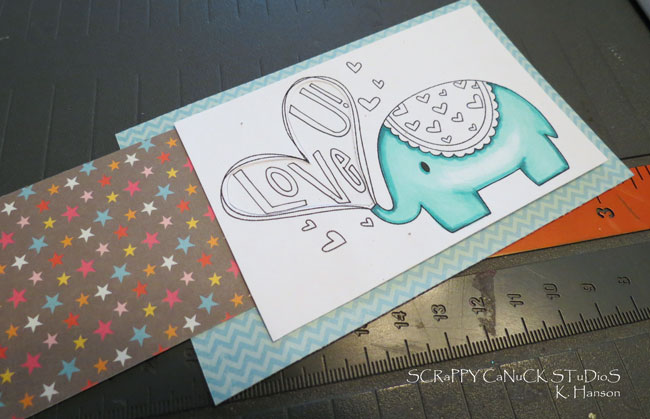
CCMT18

Pull the slider out as far as it will go without moving past the cutout. Take your cutout shape and glue it in place onto piece. You want to make sure to glue down the edges well so it does not get caught on the slider as it is moving past the cutout section.

Step 9
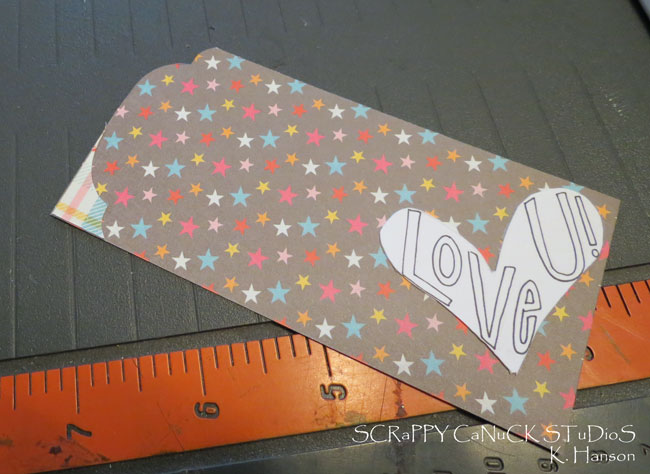
CCMT19

Optional - Pull out piece 2 completely and cut a decorative edge on the left side (I cut one side and then used the scrap piece as a template for cutting the other side).

Step 10
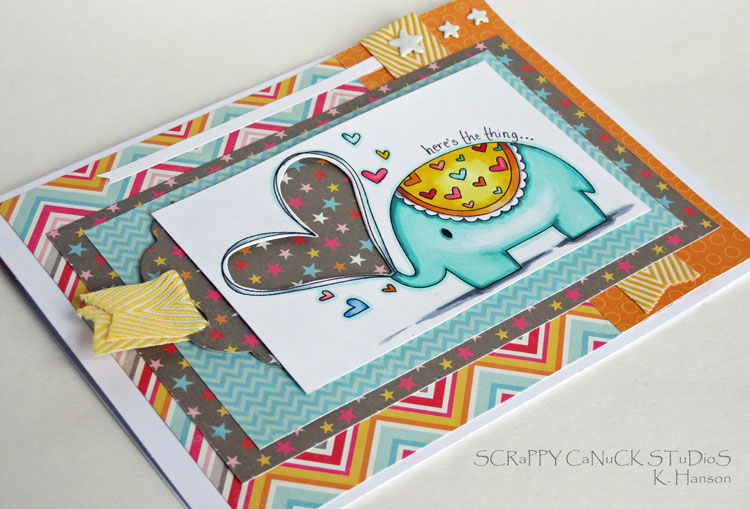
Tutorial-slider-dimension

Adhere the stamp and slider on to your card base and embellish. I finished colouring my images at this point to get good colour matching, and added a bit of ribbon to my pull tab.
Variations - If the cutout section seems like a bit too much for you, and great variation would be simply to use the same technique to create a pocket for hidden message.
Phew - I think that's it for me today! Thanks for popping by, and I hope you will give this technique for a sentiment slider a try!
Tutorial-slider-closeup2

Tuesday, June 18, 2013

DT Showcase.

Hello CCM friends and happy Tuesday!  It's once again for some chi chi fun and check out these super fun cards from our DT ladies.


"For my project I decided to use this adorable bird image from the Spring is Here set.  I printed the image and colored it with my Copics.  I then fussy cut the image out super close to the lines.  I then cut this branch using my silhouette portrait and used foam tape to pop the birdie off the branch.  I printed out the sentiment and used a punch for the thought bubble.  The entire project is backed onto some digital scrapbook paper that I printed.  I just think he is the "tweetest" little thing, don't you?"


"For my card this week I used Spectrum Noir Markers to color the image. I printed the verse in big, bold letters and then cut them apart to make a few banners. I used my Banner Punch to create the banner across the top, and Distressed Dots as a background stamp.  The colors used on this project are from last week's Color Q Challenge of Island Indigo, Bermuda Bay, Certainly Celery and Real Red. It was a fun card to create!"


"I love altering small notebooks.  They make great gifts to give for any occasion.  I have given so many away, I have never stopped to make one for myself; so today I did.  These smaller sized notebooks I found at Michael’s in the dollar area.  For this note book I used the adorable image called Ladybug Costume.  When I saw her I knew I wanted to do something cute.   She turned out adorable, didn’t she?"

Alice

"I love red, white and blue mixed together.  I think it’s one of my favorite color combos and because it’s my favorite I decided to use the 4th of July set.  I love to pop my images and with this set you can do just that!  I hope you’ll check out the entire set of the 4th of July digi set, it’s super cute and a must have!!!!"

I hope you like them and please come by tomorrow.  We will have a special post!  ;)

Friday, June 14, 2013

DT Showcase

TGIF chi chi friends!  
It's showcase Friday and we are super excited to share with you more CCM projects.


"Since this weekend is Father's Day, I decided to use the super cute individual digi called "Freddie Loves Daddy" for my project!  I coloured these two cuties up with Copics, and hand-wrote the sentiment, using Echo Park paper and some May Arts ribbon for the card base. I also used a bit of Glossy Accents on the hearts to add a bit of dimension to the image.  I love the playful colours and patterns on this card - I think it is a fun way to show any dad how much you love and appreciate them!"


Kerry

"Are you ready for a tea party?  These adorable chicks sure are have an awesome time.   I just adore the Tea Party set.  I colored the chicks with Copic markers and I popped their adorable party hats.  The paper is from Echo Park Summer Day.  For the sentiment, it's also from the Tea Party set and I added some jewels from Eyelet Outlet."


"I made a CAS card to showcase this cute little bee from the Spring Is Here set. I used Copic markers to color in the bee and I used a fine point sharpie to mark in the dashed lines for movement."


"For my project I used the Splash of Fun Submarine stamp. I just love the little bear inside the submarine! I found some Cosmo Cricket rub-ons I hadn't seen for a while and thought they would be perfect to use for this image. Add in some Echo Park Perfect Summer paper, a spellbinders die, paper piercing, some ribbon and presto, you have a cute card for any occasion. As usual, I colored with my Spectrum Noir alcohol markers."


"I had such great fun creating these cards using Birthday Boy, and Birthday Girl. I started creating the cards I new I wanted to keep them pretty basic so the details on the cakes would be the main focus. I have to admit that my favorite is the boy cake, I love the little cars.  All the images were colored using Copic Markers. I also use Memento Dandelion ink for the yellow border around the boy cake, and tried out my sewing skills.  I was really pleased with the bright colors I used for each card and I think they both turned out very festive."


Well, what do you think?  Hope you like them and have a great crafty weekend!

Tuesday, June 11, 2013

DT Showcase.

Hello CCM friends, hope you are having a wonderful day.  
We are sharing some fun and beautiful creations from our DT.


Check out this adorable card using Spring is Here set!

"For my project, I used the single flower image from the Spring is Here set.  In MS Word. I repeated the images for a panel; printed my sentiment and finally embossed the background for a very quick and simple card."


How about  some swinging fun from the Summer Fun set?

 "Swinging is fun, but it's so much better when you do it with a friend.  I decided to combine the two images from the Summer Fun set and added the sentiment below the image before printing it.  The images are colored with Copics and the background is done with chalks.  For added dimension I used thin twine along the swings for some extra fun!"


Time to celebrate!  Check out the super cool card using the  4th July set!

 "My card was created using ink pads and a blending pen. It is a double easel card with white waffle paper and Sizzix Die Cut Stars. The card folds flat for mailing and fits perfectly into a 5x7 envelope."


Don't forget to say hello to clown Jordy from the Happy Carnival set 
and all his cool balloons from the Tea Party set.

"Celebrations are super fun especially when it comes to clowns and balloons.  I loved the balloons from the Tea Party set so I printed them out several times onto printed paper and added twine to give them the appearance of floating.  The clown is from the Happy Carnival set and I added glitter to his outfit so he shines as the star of the card."

Hope you like them and we will bring to another fun DT showcase this Friday!

Friday, June 7, 2013

Let the party begin! Part 2!

Hello CCM friends and did you enjoyed out DT showcase on Tuesday?  
And are you ready for more?  Without further adieu...


Check out this beautiful card using Splash of Fun set! 


Here is another card using Splash of Fun set. 

"This set is just too cute and perfect for getting me in ready for summer
water activities.  I knew I wanted to do something to create the feeling of
swimming and incorporate waves into it.  So I started with a step card
thinking this would be an easy way to show some dimension with the image
and waves plus the image could be large and featured in the back.  The
waves I cut using my Silhouette and then I trimmed them up so they would
fit on the first step and the card front.  In order to make the swim mask
look like clear glass I used some Inkssentials Glossy Accent.  The image
was colored using Copic Markers and Memento Summer Sky ink was used as
well.  It folds flat perfectly for mailing" 


An adorable card using single digital stamp Hug.

"When I was looking through the ChiChi Memories store, I fell in LOVE with this stamp called "Hug".  As a mom of two little gals, this image just touched my heart.  I coloured this image up using Copics and embellished with paper from Echo Park and ribbon from May Arts.  This darling image would be awesome on any greeting for a daughter, sister, or a card for any influential lady in someone's life!"


A great Fathers' day card using Happy Daddy's Day.

"A Father's Day card using the blue ribbon image from the Happy Daddy's Day set paired with kraft paper to give a rustic look perfect for dad."


Here is another card using Happy Daddy's Day set. 

"Here is a simple card for Fathers' Day, I used Happy Daddy's set.  Don't you just love Jordy with his super hooded sweatshirt and his 'I love DAD' button, hehe!  I colored Jordy with copic markers and the paper is from Echo Park This & That."


Well, what do you think?  We hope that you enjoyed them.  Thanks so much for stopping by!

Tuesday, June 4, 2013

Let the party begin!

Hello CCM friends, how are you today?   
We are super excited to show you a few projects from our new CCM DT.


We love how Alice did a bit of alternations, she fuzzy cut out the drape which is the stage from the Puppet Show set and the adorable clown from the Happy Carnival set.  


An adorable birthday project with Spring is here set.   Don't you just love it?  
So cute! 


Who wouldn't want to go fly a kite on such a fun summer day?  
Lynda used Summer Fun set and she printed the sun and kite image twice and popped the image
off the card using dimensional glue.  The images are colored using Copics as well as chalk.


How about his cute elephant Freddie is from the 4th of July set?
Freddie is colored using water based markers directly onto the paper and finished with a patriotic banner and the lovely glittery stars.

We hope you enjoyed this projects and stay tune!
We will have another DT showcase on Friday!

Monday, June 3, 2013

Say welcome to the new CCM Design Team

A Big Hellloooo to all you CCM fans out there! Here's some exciting CCM updates ~ We`ve officially got our team of enthusiastic talented DTs together and we`re ever so happy to introduce them to everyone!

Kerry Kung (DT Coordinator)

Alice Carman(Senior DT Member)

Lawren Fowlkes

Lynda Lindley

Katherine Rock

Karen Hanson

Melissa Oeters

Kim Sherrod

Marcee Rodgers

We`re very excited to see what cute projects these ladies can make with CCM digis! Are you looking forward to them too? Stay tune! Projects are starting to come out THIS Tuesday! Yeahhhhh~

Curious about CCM new releases?! They're coming out the 1st of July :D. Be sure to keep up to date with us, we promise to have surprises!

Hugz
Natalie & Cassandra 

Friday, May 31, 2013

Let's the show begin!

Hello CCM friends and happy Friday to you!

Let's the show begin!  I'm sharing a card using the Puppet Show.
Love it, so so cute?!  I just love little prince and princess, and do you see the teddy bear above the banner?


I used the stage, the prince, the princess, the adorable bear, and the sentiment 'Hello cutie pie'.


Then I colored the image with Copic markers, layered them with foam tape. and added some sparkles and blngs.


Related Posts Plugin for WordPress, Blogger...