Sunday, September 29, 2013

Guest DT Showcase

Hello Ladies! Its Sunday again, can't believe its October in a few days! Time flies by so fast. We're finally getting a fall breeze in Hong Kong, how's the weather where you ladies are?=)

Here comes our Guest DT's showcase of the week, using stamp set from  - Party Time!


I colored the cake with promarkers and added some pink pearls as accents. I also added some rock candy stickles in the icing circles and glitter in the lighted candle.
And...since October is coming up, here are the sneak peeks of the upcoming October stamp set!!! Hope you're looking forward to it!!!


 Hope you like them! Have a nice weekend!

XOXO,
Cass  & Nat

Friday, September 27, 2013

Friday DT Showcase

Hello CCM friends and happy Friday to you!
Any plans for you this weekend?  
Hanging out with the family, running errands or laundry?
How about some crafting time?  Here are some super adorable projects to get you started!  


Karen

"What's better than a cute stamp from ChiChi Memories?  A cute stamp from ChiChi Memories with a cupcake!  This month, Candace is all dressed up for a tea party, complete with a tea cup facinator, and she is holding one of my favourite treats!  I just love her cute pigtails and detailed dress - this stamp is so much fun to colour!"


Marcee

"Fall is finally upon us here in the states, but that doesn't mean you can't use spring-y colors. This adorable image just said pretty colors to me, so I used lots of yellow with a bit of pink. I kept the bard base neutral and added a few pearls to keep it soft.  I have loved using the Party Time set SO much!"


Melissa

"I have a little bird house birthday tag to share today.  Watching the birds out the window this morning got me inspired and Chi Chi Memories had the perfect bird in the set Tea Party  to work with.  It will be a cute little addition to a birthday gift bag."


Kim

 "I am using Candace from the Friendship set. She is all decked out in Fall colors. I added grass using a technique called "Pointillism"in various shades of green Copic markers. I embossed the brown cardstock using a large dot embossing folder. I then punched a decorative border on the orange cardstock. After all the elements were assembled I used organdy ribbon for the bow and added a flower and pearl in the center."


Tuesday, September 24, 2013

Tuesday DT Showcase

Hello hello CCM friends!  Happy Tuesday!
We are excited to share a few super cute card for you today.


Lynda

"I decided to use the cute cloud image from the Summer Fun stamp set as the focus for my card this week.  I printed it onto my cardstock and then used an exacto knife to cut along the edge of the cloud.  I then layered colored cardstock to look like a rainbow.  I used chalk to create the sky color and to add some depth to the cloud, including some cute cheeks!  I'm sure this greeting will bring a smile to someone's face when they find it in their mailbox!"


Alice

"This is an oldie but goodie digital set from Chi Chi Memories called, “Baby Flower”.  You’ll want to add this to your stash as well.  I think of these sets as collectibles because you just can’t have one.  Get yours today!"


Kerry

"I absolutely adore the Tea Party set and I decided to make a tag inside of a card.  I colored Jordy with copic markers and cut him out and pop him with some 3D foam tape.  And for the tag, I went for the distress look, I inked it with distress ink pad, added some tissue tape, pattern paper, lace, wood piece, frantage and twine.  Viola!"

Sunday, September 22, 2013

Guest DT showcase

Happy Sunday crafty ladies!

Hope you're enjoying the weekend! We are experiencing a huge typhoon here in Hong Kong, not so much fun to get stuck at home during the weekend but glad that we can still do some designs on the upcoming CCM digis.

We're showcasing our guest DT's weekly project made with our September stamp set - Party Time!


 Hope you like them! Have a nice weekend!

XOXO,
Cass  & Nat

Friday, September 20, 2013

Friday DT Showcase.

Hello hello CCM friends and happy Friday! 
Do you have any plans this weekend?  How about some crafting time?
Here are a few creations from our amazing DT members...


Melissa

"This week my inspiration for you is chocolate inspired.  I always make my stamped cakes colorful, I've never done a chocolate before (on paper).  I liked this big wide ribbon and decided to incorporate into my card. I wanted the cake detail to stand out so I kept the card simple. I have never met a chocolate cake I haven't liked!"


Kim

"My card today is on the CAS side. I wanted to showcase the apple tree from the Spring is Here set. I embossed the white cardstock using the Swiss Dots folder. I freehand cut the green cardstock to resemble grass then using 3-D foam tape I adhered the tree to the white embossed cardstock and placed the grass on top." 


Marcee

"I just love this little group of animals and it's awesome that you can customize the little banner. I decided to try something a little fun this week and do a step card. I kept my card simple by using paper with mostly same colors and adding a few embellishments."

Wednesday, September 18, 2013

Hair tutorial with Karen.

Tutotrial-full

Tutotrial-closeup 

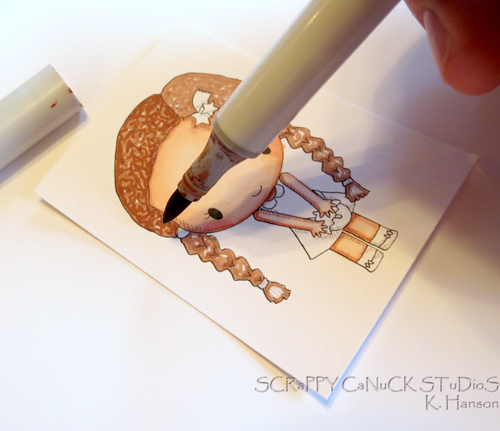
  Today, I have a quick and easy colouring tutorial for you. I recently tried my hand at colouring curly hair, and I realized that it is quite different from tackling straight or even way hair (just like in real life)! ;) I thought I would share a few thoughts on what is working for me to help get you on your way to an effect that works for you! So, without further adue - let's get colouring! ! ;) Start by grabbing a cute stamp or digi that implies a curly hair texture. Often, the image will have a wavy edge. I decided to use this adorable freebie from ChiChi Memories called "Hello Girl".

Step 1

CCMT41

Choose four colours for your hair - the middle tones will be the ones you see the most of, so choose one that is lighter and one that is darker to allow for highlights and depth. I chose Copics E23. E25, E39 and RV99.

Step 2

CCMT42

Starting with the lightest shade (E23), outline around the edges of the hair and then fill in with squiggly lines (I know - so technical)! Don't worry about leaving white spaces!

Step 3

CCMT43

Using the next shade (E25), repeat the same steps, using this next layer of squiggly lines to fill in some of the white spaces, but also to overlap the ones you have already drawn. When finished, it will look something like this:

CCMT44

Step 4

CCMT45

Using the 3 lightest shade (outline the edges of the hair once again. Using short strokes and dots, add texture to the hair. At this point, you want to make sure that most of the white is now gone.

Step 5

CCMT46

This is my favourite step because it really starts to create depth in the hair. Using your darkest shade (like RV99 - don't be afraid to use a dark colour here - even on a lighter hair colour), add short, squiggly lines and dots, focusing your strokes around the outside edges of the hair, and in any parts that would be recessed - like a part. Colour along a few of the lines you created in step five, staying on one side of the line.

CCMT47

And that's it! I think it gives a pretty good illusion of curly hair without too much effort! Four colours, four layers, and you are ready to get this cutie onto a card!
So there you have it, now go have some fun colouring hair! Thanks for stopping by today!

Tutotrial-angled

Badge_KarenHanson

Tuesday, September 17, 2013

Tuesday DT Showcase

Hello hello CCM friends!  Did you see the new September freebie?
Check it out below!  So so cute, right?!
And here is a couple more adorable sample for you!
Grab you freebie HERE and join the fun.
We can't wait to see what you will come up with!


 Alice

"We just adore this freebie stamp of the month, don’t you?  What an awesome stamp to have in your stash and did you see the rest of the stamps from Chi Chi Memories this month?  Come and get them and make someone special a one of a kind card using our digital stamps today!"


 Kerry

"Oh my goodness, isn't he just too cute?  Halloween is my favorite holiday!   I just love all the super fun halloween theme crafting supplies.  They are all so fun and of course, the halloween costumes, pumpkins craving and especially the yummy candies."


Lynda

"With school starting it's time to showcase that good friends have your back!  I colored these cuties from the Friendship set with my Copic markers and then added some chalk in a few places to add some depth to the girls.  The card was finished with this cute flower and button."

Sunday, September 15, 2013

September Freebie is here!!

Happy Sunday Everyone!

Did you have fun with the August freebie?! Or did you miss it? Don't worry, September freebie has just been released it! Its Jordy all ready for Halloween!! Isn't he suppperb cute?! What are you waiting for? Go grab it and play with it! We can't wait to see your inspiring creations!!

http://ccmchallenge.blogspot.hk/2013/09/september-ccm-challenge.html


Have fun!!
xoxo,
Nat & Cass

Guest DT Showcase

Hello Hello Everyone. Happy Sunday! Here's another set of creative & cute projects from our Guest DTs!


Ria Montefalcon 


"I did dry embossing in the card base and polka dot stamping at the green background. Really love coloring Jordy, just a darling."

Have a wonderful day! 

xoxo,
Cass & Nat

Friday, September 13, 2013

Friday DT Showcase.

Hello CCM friends and happy Friday.  
Welcome to another super fun showcase featuring our new September release, the Tea Party set!  
Without further adieu, here they are...


Karen

"One of my favourite stamps from the new "Party Time" new release is Jordy.  Not only is he such a cutie, but the stamp is really versatile.  Use him for an invitation to tea, for coffee date, for a thank-you or even to remind a loved one to take a moment to take care of themselves!  All dressed up, Jordy is sure to make anyone smile!"


Melissa

"I new this little man needed a tea cup card to show off his serving abilities.  Remember guys like tea too, at least we know this fellow does and he wants you to join him in a cup.  I wanted to make this card more masculine so I kept my colors gray and blues, but I did manage to add a touch of pink."


Kim

"I made a birthday card using the Party Time set. The cake was colored in using Copic markers and cut out with an oval doily die. The edges of the doily was distressed with green ink. I cut out 2 triangles and embossed the white cardstock with a happy birthday embossing folder then pieced them together. I added the border shape on top to hide the seam line. Last I used seam binding to tie a double bow and added a brad in the center."


Marcee

"What a fun cake! I love all the detail and adore that it can be used for any occasion."

Well, what do you think?  Hope you like them and have a great crafting weekend!

Tuesday, September 10, 2013

Tuesday DT Showcase

Hello CCM friends, hope you had a great start of the week.

We are super excited to show you more projects using the new CCM September stamp set.
Without further adieu...


Alice

"Alice here, sharing Chi Chi Memeories NEW digital stamp release called, “Party Time”.  Super cute set that can be used for any type of  celebration.  I love Jorgy’s adorable suit in this set.  Come join all the fun!"


Kerry

"I'm totally in love with the Time Party set, isn't Candace super adorable with her tea party outfit!  And not to mention the yummy cupcake?"


Katherine

"I love the images in this month's release Party Time, but this little group of animals is my favorite - hands down! The shading on the stamp makes it super easy to make these little guys pop off the page. I wanted to make something a little out of the box this week and thought it would be fun to add a few birthday candles. They sure make this gorgeous lime green ribbon really stand out!"


Lynda

"I knew right away when I saw this little sweetie in the Party Time set that I had to use her as the focus of a card.  I colored her using my Copic markers and then mounted her on this wonderful sheet music pattern paper.  I then created the sentiment banner with extra cardstock and added to the front of the card using foam tape.  I'm sure she'll make the perfect greeting for any reason!"

Aren't they super cute?  Thanks so much for stopping by and happy crafting!

Sunday, September 8, 2013

Guest DT Showcase

Hi Everyone, Its Sunday again and here comes some cuteeee designs from our Guest DTs! They are just so adorable! Don't you think so too?


"I have a ribbon stash and some were used for a project or two. Its so nice to see them again in a card like this. Pink & blues are one of my favorites especially for little boys and girls.
I think Candace looked just so adorable with all the happy colored ribbons behind her. For some texture, I added glossy accents in cup's heart and stickles on top of her cupcake. This is a great birthday card or just a card to brighten one's day."


Have a wonderful day! 

xoxo,
Cass & Nat
Related Posts Plugin for WordPress, Blogger...